
|
|
||||
|
|
||||
|
|
||||
|
|
Things We Made, Things We Did Two young men had some spare time on their hands. One man asked
the other man: "What are you going to do in your spare time?" "I think I will make myself comfortable in my favourite chair
and I will read a good book," answered the other man. "What are you going to do in your spare time?" asks the
first man. "I will go into my shed and I will make a nail," he answered. The first man read his book and the second man made a nail. Now
they asked one another again. "What will you do now?" asked one of them. "I will read another book," he answered. The other man said that he will make another nail. You can't stop people from doing what they want to do, or what they
want to make. If you want proof of that just look at how many books
there are in the libraries and look at how many nails and other things
there are in the Bunnings warehouses. The man who made the nail helped
start the industrial revolution and look how far he has advanced mankind.
The man who read his book helped the civilisation of mankind and now
look how civilised, healthy and comfortable we are. I was a boy who
wanted to make nails, figuratively speaking. And now that I am an
old man I still enjoy making nails, figuratively speaking. Richmond Technical school taught me how things work and provided
me with the facilities to make nails and other useful things. Listed
below are brief descriptions of some of the things students in technical
schools made. 1. In Woodwork they learned to sharpen chisels, plane blades and such. They learned how to maintain all the carpentry tools. With those tools they made a pencil case, a fruit bowl and a coffee table. 2. In the Sheet Metal workshop they learned how to solder sheets of metal together and they learned how to bronze-weld using oxy-acetylene welding equipment. They made oil cans and they joined sections of downpipes together. 3. In the machine shop they learned how to cut and shape metal and
how to make things out of metal. The machine shop was equipped with
lathes, shaping machines, drill stands, grinders and all sorts of
hand tools. A student could make a whole car if he wanted to. My brother
nearly made a car; this comes later. The machine shop was my favourite workshop, students called it "turning
and fitting". Because that is precisely what they did there.
They turned metal on the lathe and they made things that fitted together
to make tools such as a soft metal hammer (I still have it at home),
a G-clamp used to clamp parts together (I lost it), a bottle car jack
(I wish I kept it). The bottle car jack deserves more page space here because it was
a proper engineering project. The body of the car jack was made out
of cast iron and it was made by pouring molten iron into a casting
mould at a foundry in Richmond. We went to the foundry and watched
the casting of the bottle car jack. Back in the school's turning and
fitting workshop, we cut a "square-female" thread into the
body of the car jack. And then we turned a round shaft and cut a matching
"square-male" thread onto it to complete the car jack that
could lift a full-size car. In addition to the mandatory items made
at school, my brother and I made our personal toys with the blessing
of the teachers at the senior apprentices' school. We were in a tech-nerd's
paradise. Before the age of 18 my brother Steve purchased a non-running Austin
Healey Sprite Mark 1. He paid the wreckers $240.00 for it and he proceeded
to repair it and make it roadworthy. We dismantled its engine and
brought the crankshaft to the senior tech for it to be ground by the
apprentices. The crankshaft has seven journals, and seven apprentices
ground one journal each and each journal was ground to a different
diameter. This caused additional complexities for us in reconditioning
the engine, but we eventually completed the engine. We managed to
put the car together and we spray-painted it as well. This was proof
that one could make a car at Richmond Tech. More specific details about completing the car could increase the
risk of losing my readers at this point. So I will move forward to
a more people-related incident involving the rigorous roadworthy checking
and registration of Steve's Sprite at the VicRoads centre, which was
located in Lygon Street, Carlton. A car without previous registration records, like the Sprite that
Steve bought from the wreckers without any official papers, had to
go through a thorough inspection over a dugout pit in the floor of
a workshop at VicRoads in Lygon Street. The date for the full inspection of the car was prearranged, the
Austin Healey Sprite was ready to go. I drove the car as Steve didn't
have his driver's licence yet. On the way to the inspection pit, I
noticed that the car wasn't running freely, it was reluctant to go.
The brakes started to lock, that is the brakes were "on"
even when I wasn't pressing the brake pedal. The roadworthy inspector
motioned me to drive the reluctant Sprite over the inspection pit.
I had to use almost all of the power that the little car could muster
to bring the car over the pit. While the car was stationary, the brakes
had a bit of time to cool down while the inspector was giving it a
health check. "Off you go," he calls out after the health check. But the little Sprite wasn't free from its jammed brakes and therefore
not ready to go without the extra revving of the engine. I managed
to drive the Sprite away from the inspection pit and I parked it as
soon as I could. The roadworthy inspector didn't notice that the car
had faulty brakes and unbelievably he gave us a roadworthy certificate
for a car with faulty brakes. This was after a thorough inspection
over the VicRoads roadworthy inspection pit. I couldn't believe it. It wasn't only full-size cars that we restored and worked on. Carmelo
and I made model aeroplanes powered by small two-stroke glow plug
engines. The glow plug engines didn't need a spark plug or a distributor
to power the engine. They required an external battery to heat the
platinum wire in the glow plug. The hot wire ignites the volatile
fuel mixture that was called ether, a mixture of methanol, nitromethane
and oil. After a few flicks of the engine's propeller with my finger
the engine would start spinning. Starting the little engine was done
in a similar way to how the early propeller driven air force planes
were started. We flew the planes by a hand-held control device made of two fishing
lines. We flew the planes in large overhead circular orbits. By holding
the lines steady we kept the planes flying in a circle. By moving
the control handle sideways and thus controlling the ailerons of the
tiny planes, we could make the planes go up or down. It took great
skill to make the aeroplanes skim the ground and then make them climb
up again. We flew our planes on the school's oval after school hours. The
aeroplanes were amazing. We made them out of balsa wood according
to our designs. We shaped the balsa wood into the form of an aeroplane,
we sanded them smooth and brushed them with a substance called "dope"
to harden the surface of the planes so we could rub them to a smoother
finish for a better aerodynamic performance. We taught ourselves about the profile of the wings, which gives
the aeroplane its lift, we learned about the attack angle which also
creates lift, and we learned about the "stall" angle of
aeroplanes. The stall angle is critical, it must not be exceeded.
Because if it is exceeded, it causes the plane to stall and to fall
out of the sky. We learned about the aerodynamics of planes and cars with the help
of one of our maths teachers, who was a car enthusiast himself. He
introduced us to the formula for the coefficient of drag, which indicates
how efficiently a car or a plane can move through the air. I remember
him emphasising that if you want to double the top speed of a car
you need to increase the engine power by a factor of eight. Wow, this
was fascinating, how was speed related to engine power? I wanted to
know more about this relationship and I eventually found out when
I was studying engineering. They were amazing years for science and engineering students. The
arrival of Donald Campbell's stunning Bluebird at Lake Eyre in South
Australa in 1964 could not have been better timed. The stunning Bluebird,
a streamlined car, set a land speed record of 403 miles per hour (mph)
for cars. The car's jet engine had over 3,000 kW of power and the
coefficient of drag was 0.16; igniting further interest about our
math teacher's above-mentioned statements. The wheels and tyres of
the Bluebird were specially designed by Dunlop, the tyre manufacturer,
to withstand the enormous centrifugal forces. We were studying physics, maths and engineering at school and out
of school hours. And the whole world was engrossed in the space race
between America and Russia; television news in the evening always
included a space race segment. Those tiny glow-plug engines could spin up to 20,000 revolutions
per minute. What a great engine to connect directly to the rear wheel
of a model car and to see how fast it would go, I thought to myself.
I made a 1/8 scale model of my dream car, the Jaguar E Type (my version
of the Bluebird). I made the wheel out of a round piece of aluminium
on the school's lathe and fitted on it a rubber tyre from one of my
aeroplanes and I fixed the wheel on to the E Type. The engine started with the first pull of the zip starter that was
also made with the school's lathe. But in no time at all the rubber
tyre expanded under the centrifugal force created by the spinning
wheel. The tyre flew off the wheel, damaging the right rear mudguard
of my E- Type Jaguar. Undeterred I wanted to use that glow plug engine on a propeller
driven car. So I made a rudimentary chassis and I attached four small
wheels on it. I secured the propeller fitted engine at the back of
the rudimentary four wheeled car. I started the engine and let the
car go, hoping to see the chassis-with-wheels set a new land speed
record for model cars. Disappointment was immediate as I watched the chassis-with-wheels
roll and eventually destroy itself. Confirming Newton's third law
of motion which states "To every action there is an equal and
opposite reaction". What a wonderful practical demonstration
of Newton's third law. The propeller wanted to go one way and the
engine together with the chassis went in the opposite direction. Had
the chassis been heavy enough, my propeller-driven car would have
worked and it would have moved forward and it would have accelerated
according to Newton's second law of motion. The second law of motion
states: The rate of change of momentum of a body is proportional to
the force causing that change in the momentum. From this relationship
one can derive the equation F = ma (F stands for force, m stands for
mass and a stands for acceleration). This equation is music to the
ears of a car enthusiast because it relates the force of the car's
engine to the acceleration of a car, and car enthusiasts love acceleration. My brother and I continued making model cars, including a basic
model racing car track that was set around the garden bed in our backyard.
We also entered an international model car competition, which nearly
landed me with a car designing job with General Motors Holden. Steve took a different direction and he made a small sailboat for
himself that he enjoyed using. I also made something different, not
involving cars as usual.
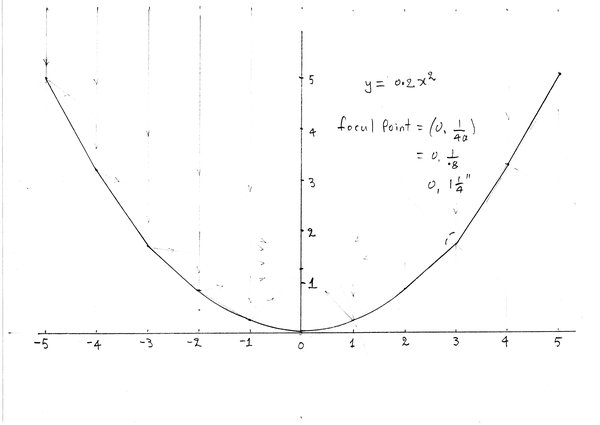
The same maths teacher who talked about the coefficient of drag
introduced us to quadratic equations and parabolic graphs during maths
classes. The parabolic graph, together with its focal point, struck
a chord with me when the maths teacher said that parallel rays of
light entering a parabolic mirror will reflect back and focus at the
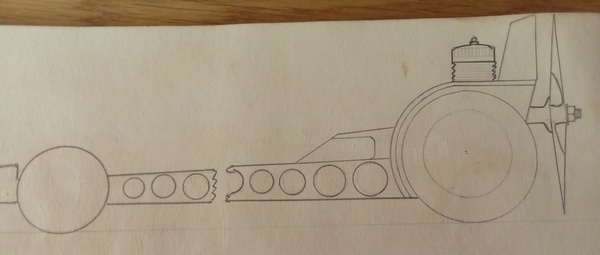
focal point within the mirror. At that moment I had a brilliant thought and I wasted no time making
a parabolic dish that would demonstrate that concept. I went to the
apprentices' school and asked the teacher if his students could panel
beat for me a parabolically shaped dish out of aluminium about 200mm
in diameter. The teacher was happy to oblige as he was always looking
for interesting objects for his students to make. I did notice that they had knights' armour that they made displayed
on the walls of their workshop. This showed me that they can panel
beat anything. I polished the inside of the aluminium parabolic dish
that the apprentices made for me and I made it shine like a mirror.
The next step for me was to make a Stirling hot air engine during
the turning and fitting classes. I enjoyed turning the relatively
large brass flywheel and making the connecting rod, piston and the
finned cylinder (you must look up the Stirling engine online). I mounted
the engine in the parabolic dish with its cylinder head at the focal
point where the sun's rays were focused and thus heated the air in
the engine's cylinder. Well, to my amazement the Stirling hot air
engine worked. A very old engine design powered by solar energy -
a new age energy form, this was amazing. There will be more descriptions about solar powered cars in the
next chapter, but now let's move on to another interesting contraption
that I made at home and then we will check if those meat pies in the
oven are ready. If you think that the school's curriculum centred around physics
and maths relating to cars you would be wrong. Physics and cars are
what I concentrated on, because that is what I liked. The school covered
all academic subjects, sports and activities with the exception of
debates, something that private schools were concentrating on, presumably
because they were training their students for a socially interactive
life. Our school was training students for a technological workforce,
and it succeeded, as indicated by the 80 per cent of the final year
students who went on and studied engineering. Richmond Tech succeeded
in preparing its students for a technological world because the teachers
had practical work experience in the real world and they liked what
they were teaching. After school there was a very popular science show on TV called
Why Is It So? which I tried to watch as often as I could. Professor
Julius Sumner Miller was an excellent presenter and demonstrator of
scientific concepts on his show and he was able to engage students
with his love for physics.
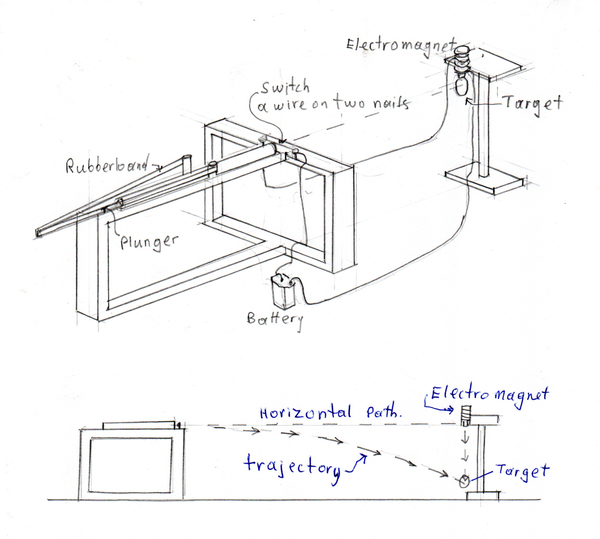
You too can make a similar device that proves that all objects fall
towards the centre of the earth at the same rate; then you can consider
yourself an experimental physicist and an engineer. This is what you need: 1. A long round tube, 25mm in diameter and about 1/2 metre long. 2. A small round object to be your projectile, e.g. a marble, a ball bearing, or a small dowel. 3. A strong rubber band so you can force the projectile along the tube at speed. 4. An electromagnet, made by winding lots of insulated electrical wire around an iron nail, a nine volt battery and a length of electrical wire that will act as a rudimentary switch to switch off the electromagnet. 5. A target, a small light object that the electromagnet can hold. You could use a piece of wood with a small nail in it so that the electromagnet can hold the piece of wood. 6. A bench or a frame to mount the channel horizontally and to attach the rubber band. 7. A stand to hold the electromagnet at the same height as the channel,
about 1 metre away from it. Method of operation: set up the equipment as shown on the diagram:
Attach the stripped wires loosely over the end of the channel
so they don't slow the projectile as it passes the rudimentary switch. Pull back the rubber band or the spring and watch the projectile
hit the target. You might have to adjust the distance between the target and
the end of the channel. You might have to experiment with the number of windings in order
to make a strong enough magnet to hold the target. I hope you will persevere with the experiment and you will feel the
joy of success and get an understanding of what experimental physicists
and what engineers do. This practical hands-on type of teaching by Professor Miller and
by the teachers at Richmond Tech engaged me and taught me not only
physics but financial maths as well - perhaps the most important and
beneficial maths lesson of all. It was during form 3 when the maths
teacher taught us how to work out problems dealing with money. Hire purchase was a very common method of buying and paying for
goods during the booming 60s. With hire purchase, the purchaser makes
a small initial payment, a deposit, and agrees to pay the rest of
the purchase price over a period of time with regular payments. The
deposit plus the regular payments always added up to more than the
sticker price of the item. We completed many such calculations for
various goods that people bought on hire purchase. And we were able
to express the extra cost as a percentage of the original price. The
extra cost was outrageous, both as an amount and as a percentage.
The maths teacher encouraged us to pay for goods in full, to avoid
the added cost. Then the maths teacher introduced his class to a new financial term.
He introduced the term "depreciation", which means reduction
in value. And he showed us how to calculate the reduction of value
due to the depreciation of an item. New manufactured items depreciate with time, usually by about 15-20
per cent per year. I saw the depreciation as a gain for me, not as
a loss. I could now buy a used car at a much-reduced price. For example,
a five-year-old car depreciating at 15 per cent each year would cost
less than half of its original price. Purchasing my cars after they
had depreciated by more than 50 per cent has saved me a substantial
amount of money over many years of car ownership. Four-five years
is the "half-life" of a car, in terms of money. That is
a $60,000 car devalues to $30,000 in one half-life; it goes down to
$15,000 in another half-life. So you can buy a $60,000 car for $15,000
when it is eight-ten years old - what a bargain. An Aussie In A Parallel Universe
|
 |
 |
|
|
|
|
|